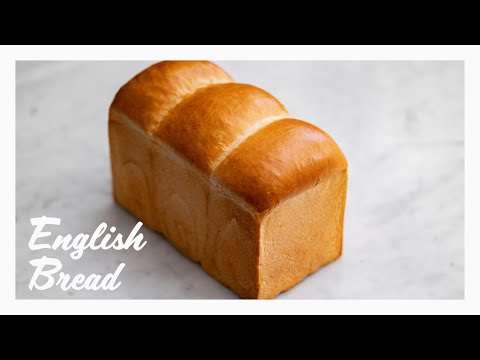
💜💜 波蘭液種 X 免揉麵包💜💜
星期一影片分享時間又到啦🎞
之前用廚師機整麵包通常會用湯種,自從做多咗 #免揉麵包,通常都係直接法。有人問我可唔可以加湯種入免揉麵包,用 #湯種 已經做過好多款式,不如就試用 #波蘭液 種做一次實驗啦!
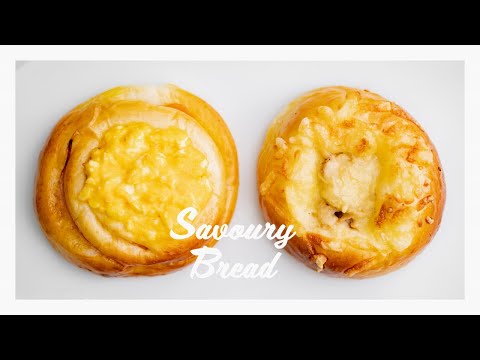
無論用什麼種做麵包,都可以增加麵包保水能力,麵包第二日食都不會容易老化變得乾硬,吃起來的時候仍然鬆軟。但因麵團水份用量比較多,造型是要用多點手粉,如果做 #造型麵包 用免揉方法,花紋不會太明顯,所以我覺得最好做這個簡單餐包,感受一下液種的味道
如果你係新手,就建議你練習多點控制麵團排氣及滾圓反出光滑面等等...有基本技巧後,再挑戰呢個高水份麵團💪🏻
#做麵包的方法實在太多
#揀一個適合自己 #方便自己的做
#最後當然要好食
同時也有85部Youtube影片,追蹤數超過2萬的網紅生かし屋 IKASHIYA CULINARY ART,也在其Youtube影片中提到,ストレート法で作る基本の山食パン(山型食パン・イギリス食パン)の作り方です ストレート法は最初から材料をすべて合わせる作り方で、 メリット:短時間で出来る、風味が良い デメリット:ボリュームが出にくい、でんぷんの老化がはやい=すぐぱさつく という特徴があります おすすめの強力粉は窯伸びの良い...
「yeast bread fermentation」的推薦目錄:
- 關於yeast bread fermentation 在 Facebook 的最讚貼文
- 關於yeast bread fermentation 在 Ying C. 一匙甜點舀巴黎 Facebook 的精選貼文
- 關於yeast bread fermentation 在 Foodeverywhere Facebook 的最讚貼文
- 關於yeast bread fermentation 在 生かし屋 IKASHIYA CULINARY ART Youtube 的精選貼文
- 關於yeast bread fermentation 在 cook kafemaru Youtube 的最讚貼文
- 關於yeast bread fermentation 在 生かし屋 IKASHIYA CULINARY ART Youtube 的精選貼文
yeast bread fermentation 在 Ying C. 一匙甜點舀巴黎 Facebook 的精選貼文
[Paris bakery / 巴黎麵包店] Sain Boulangerie (for English, please click "see more") 🥐🥖🍞
昨日和從科隆來訪的好友一起在聖馬丁運河附近拜訪了一家我一直想去的麵包店—— Boulangerie Sain。這家麵包店在去年 11 月開幕,主廚 Anthony Courteille 原本是廚師,曾在西班牙五星級飯店餐廳與巴黎知名的二星餐廳 Grand Véfour 工作,後來在 Sain 的原址開了自己的餐廳 Matière A。
之所以從廚師轉向麵包,除了自己的興趣之外,也因為他希望能夠扭轉工業化為麵包業帶來的惡名。他曾在接受巴黎媒體 Le Parisien 的訪問時提到,現在越來越多消費者對麩質過敏,其實正是使用工業化改造麵粉與大量添加物,讓麵包能快速發酵、生產的製程影響。他希望能藉著使用未改造的古老小麥麵粉、天然酵母、長時間發酵、手工揉橄麵糰等傳統麵包工藝,為現代的消費者帶來更健康的選擇。這也是他的麵包店之所以取名為「Sain」(法語中「健康」之意)的緣由。同一個訪問中 Anthony 還提及,自己的父母都是農民,也是工業化要求大量產出的受害者,他特別希望自己的努力能夠重拾麵包素樸且高貴的形象。
他自己以烤過的乾草和浸漬蘋果皮製作天然酵母,維也納麵包類(viennoiserie)則是使用自製的牛奶酵母發酵,麵團的香氣與彈性和一般市售麵包完全不同。Sain Boulangerie 店面雖小,但各種麵包樣樣俱全,招牌大型圓麵包名為「le Saint-Martin」,呼應位於巴黎聖馬丁運河的店址、與成為街坊麵包店的用心;店門口小小的櫃台擺滿了多種早餐與點心麵包與簡單的糕點,如美式餅乾、胡蘿蔔蛋糕、布朗尼、檸檬蛋糕等。後面的架上則有各種能搭配餐點的鹹麵包,Anthony 將自己過去身為廚師的經驗運用在製作麵包上,創作出如能和鬆軟蛋包搭配的蕎麥蘑菇麵包、適合與燻魚搭配的墨魚汁麵包、與清淡起司搭配的黑蒜榛果麵包等,簡直是麵包愛好者的天堂。如果我就住在旁邊,想必也是會經常光顧!
記得點照片看更多細節! 👇🏻
🔖 延伸閱讀:
高貴的日常-麵包成為巴黎時尚新寵:https://tinyurl.com/y3o5g399
法式甜點關鍵詞-甜點與麵包的分界:https://tinyurl.com/y4cg9uhd
*****
Finally paid a visit yesterday to Sain Boulangerie with a friend of mine from Köln. I’ve been thinking to go for a while but never got time. Sain opened about a year ago. Anthony Couteille, the chef boulanger used to be a cook and has worked at some restaurants at palaces hotels in Spain as well as at Grand Véfour, two Michelin-starred restaurant in Paris. He opened his own restaurant Matière A on the same address which is transformed to Sain Boulangerie last year.
He has decided to become a boulanger not only because bread is a real passion for him but also because he wants to change the bad image the industrial bread has left to the whole profession. In his interview with Le Parisien, he mentions that the modern gluten intolerance and allergy are resulted from the use of modified flours and additives which accelerates the fermentation and production process of the bread. By using non-modified ancient wheat flours, natural yeast, adopting slow fermentation process. and hand-kneading, Anthony wishes to remind consumers that bread could be very healthy. And that is exactly why his bakery is named as “Sain” (“healthy" in French). In that same interview, he also stresses that his parents were farmers during the agricultural industrialisation and became victims of the latter to quickly increase the farm yields. He hopes that his efforts to bring back the traditional craftsmanship would also regain the nobility of bread in our daily lives.
He makes his own yeast out of grilled hay and macerated apple peels. A milk yeast cultivated by himself is used for the viennoiseries which results in an remarkable scent and texture that are completely different from ordinary ones. Though not a big boutique, Sain Boulangerie offers a wide range of bread. The “Saint-Martin”, the signature bread of the bakery combines chestnut flour and grilled einkorn and ancient wheat flowers. Lots of great viennoiseries and simple pastries such as cookies, carrot cakes, brownies, lemon cakes are displayed on the little counter at the storefront, on the shelves behind, savoury bread to go with different dishes are also available. Utilising past experiences as a cuisiner, Anthony has created lots of interesting flavours such as buckwheat and mushroom bread to go with fluffy omelettes, squid ink bread to go with smoked fish, black garlic and hazelnut bread with cheese, etc. A heaven for all the bread lovers indeed! I would definitely become one of the loyal customers f I lived in the neighbourhood!
Click on the photos to find out more! 👇🏻
🔖 To read more on this topic:
Bread is a rising star in Paris: https://tinyurl.com/y3o5g399
The fine line between pastries and bread: https://tinyurl.com/y4cg9uhd
#yingspastryguide #boulangerie #bread #paris #sainboulangerie
yeast bread fermentation 在 Foodeverywhere Facebook 的最讚貼文
According to Wikipedia in the Encyclopedia of Food Microbiology, Michael Gaenzle writes: "The origins of bread-making are so ancient that everything said about them must be pure speculation. One of the oldest sourdough breads dates from 3700 BCE and was excavated in Switzerland, but the origin of sourdough fermentation likely relates to the origin of agriculture in the Fertile Crescent several thousand years earlier ... Bread production relied on the use of sourdough as a leavening agent for most of human history; the use of baker's yeast as a leavening agent dates back less than 150 years."
Some things evolved and some were replaced but the beauty within the art of fermentation has never changed. Here we are at Tommy Le Baker and eating something that has come a long way since ancient history- the sourdough bread.
#foodeverywhere #sourdough #sourdoughsandwich #kampungattap #tlb
yeast bread fermentation 在 生かし屋 IKASHIYA CULINARY ART Youtube 的精選貼文
ストレート法で作る基本の山食パン(山型食パン・イギリス食パン)の作り方です
ストレート法は最初から材料をすべて合わせる作り方で、
メリット:短時間で出来る、風味が良い
デメリット:ボリュームが出にくい、でんぷんの老化がはやい=すぐぱさつく
という特徴があります
おすすめの強力粉は窯伸びの良い「スーパーキングやゴールデンヨット」、老化が遅く風味もいいし窯伸びもいいし作業もしやすい「ベルムーラン」がおすすめです(動画ではベルムーランを使用)
【型生地比容積について】
自分の持っている型に合わせて生地量を調整します
1.5斤と書かれてても1.2斤しかなかったり、型によって全然違うので必須です
この型と容量と生地の比率を型生地比容積といいます
型の容量÷型生地比容積=生地量
例:1625ml(1斤弱)÷3.5=約464g
3つに分けて入れる場合は1つあたり464÷3=155gになります
型生地比容積の目安
角食:3.8~4
山食:3.6前後
(数字が大きいほどふわふわで、数字が小さいほどみっちり)
ベーカーズパーセントと比容積からレシピの調整も出来ますが、
計算が面倒なので粉300gとか多めに作って生地量を食パンに使い
残りの生地は丸パンなどにすると楽だし無駄になりません
型生地比容積についてより詳しくは↓
https://www.ikashiya.com/entry/katakiji-hiyouseki
【材料】
ベーカーズパーセント(合計:194)
・強力粉 100
・砂糖 8
・スキムミルク 3
・塩 2
・インスタントドライイースト 1
・水 72
・バター 8
粉300での分量(1斤目安)
・強力粉 300g
・砂糖 24g
・スキムミルク 9g
・塩 6g
・インスタントドライイースト 3g
・水 216g
・バター 24g
【準備】
・バターを常温においておく
・型に離型油を塗る
【作り方】
1. 【生地作り~1次発酵】バター以外の材料をすべて合わせてグルテン膜が出るまでこね、バターを加えてさらにこねる
2. より薄いグルテン膜が出るまでこね(こね上げ26℃目安)、丸めてボウルに入れてラップをし30℃で60分発酵させて、打ち粉をして台に取り出す
3. 上から押さえてガスを抜いて広げ、上下左右から3つ折り×2で折りたたみボウルに入れてラップをし、30℃で30分発酵させる
4. 【分割~ベンチタイム】生地量の1/3ずつに分割してガスを抜き、きれいな面が外側にし表面を張らせるように丸める
5. かたく絞った濡れ布巾をかけて25分ベンチタイム(生地をゆるめて成形しやすくする/残った生地は同様にして丸パンなどに活用)
6. 【成形~2次発酵】めん棒で長方形にのばしつつガスを抜き(周りの気泡は手で潰す)、上下から1/3折りたたんで生地をくっつける
7. 奥から手前に少し張らせるように巻いてとじる(最初芯を作り、トップを持って下にくっつけるイメージで3回転~3回転半)
8. 離型油を塗った型に端→真ん中の順で入れ、蓋をして35℃で50分を目安に2次発酵(オーブンで発酵させる場合は予熱時間を考慮しはやめに取り出す)
9. 【焼成/180℃に予熱】生地が型のギリギリまで膨らんだら発酵完了、180℃に予熱したオーブンで焼成する
10. 180℃で30分を目安に焼き、焼き上がったら台に2~3回落として蒸気を抜き(腰折れを防ぐため)、すぐに取り出し冷ます
--------------------------------------------------------------------------
【動画でよく使ってる調理器具】
フライパン(20cm):https://amzn.to/2QyY1ny
フライパン(24cm):https://amzn.to/2UtNvz5
フライパン(24cm深型):https://amzn.to/3dj5DEp
鉄フライパン(22cm):https://amzn.to/3a8hqmR
アルミフライパン(24cm):https://amzn.to/3dj6tRz
片手浅型鍋(18cm):https://amzn.to/2QzGXha
片手浅型鍋(21cm):https://amzn.to/2U7ta3o
片手鍋(16cm):https://amzn.to/2QzCj2x
片手鍋(20cm):https://amzn.to/3bd0lZa
ソースパン:https://amzn.to/2U9keuI
まな板:https://amzn.to/2J1fQHI
ガスコンロ:https://amzn.to/3bdtvYa
牛刀:https://www.jikko.jp/fs/jikko/54803
ペティ:https://www.jikko.jp/fs/jikko/54800
撮影機材
カメラボディ:https://amzn.to/2xSXZAd
動画レンズ:https://amzn.to/3t7sfPB
写真レンズ:https://amzn.to/2U7HcCb
録音:https://amzn.to/2U9cGYT
※製品のURLはAmazonアソシエイトのリンクを使用しています
--------------------------------------------------------------------------
▼サブチャンネル(料理実験チャンネル)
https://www.youtube.com/channel/UCqIW0OHh8k2np5ZNz3wz8sg
▼ブログ
http://www.ikashiya.com/
▼Twitter
https://twitter.com/sakihirocl
▼Instagram
https://www.instagram.com/sakiyamahiroshi/
--------------------------------------------------------------------------
↓using translation software.
[Ingredients]
Bakers percent (total: 194)
・Bread flour 100
・Sugar 8
・Skim Milk 3
・Salt 2
・Instant dry yeast 1
・Water 72
・Butter 8
The amount of the flour 300.
・Bread flour 300 g
・Sugar 24 g
・Skim milk 9g
・Salt 6g
・Instant dry yeast 3g
・Water 216 g
・Butter 24 g
[Preparation]
・Leave the butter at room temperature.
・Spread mold release oil on the mold.
[How to make]
1. [Making the dough ~ primary fermentation] Mix all the ingredients except butter and knead it until the gluten film comes out. Add butter and knead it more.
2. Knead it (knead it up to around 26 °C) until a thinner gluten film comes out. Round it and put it in a bowl. Cover it with a plastic wrap and let it ferment for 60 minutes at 30 °C. Dust it with flour and take it out on a counter top.
3. Press down from the top to release the gas and spread it out. Fold it 3 times from top, bottom, left and right. Put it in a bowl and wrap it then ferment it for 30 minutes at 30 °C.
4. [Divide ~ bench time] Divide it to 1/3 of the amount of the dough then release the gas. Round it so the clean side is on the outside and the surface will stretch.
5. Cover it with a tightly squeezed damp dishcloth and bench it for 25 minutes (loosen the dough to make it easier to shape it/use the rest of the dough in the same way for round bread, etc.).
6. [Shaping ~ Secondary fermentation] Stretch it to a rectangle with a rolling pin and release the gas (crush the air bubbles around it with your hand). Fold it from the top and bottom to 1/3 and stick the dough together.
7. Roll it up and close it so that it is slightly stretched from the back to the front (Make the core first and hold the top and stick it on the bottom. Turn it around 3-3.5 times.).
8. Put it in the mold spread with mold release oil in the order of the edge to the center. Cover the lid and let it undergo secondary fermentation at 35 °C for around 50 minutes (take it out without considering the preheating time if you are fermenting it in the oven).
9. [Bake/Preheat to 180 °C] When the dough rises to the edge of the mold, the fermentation is complete. Bake it in the oven preheated to 180 °C.
10.Bake it at 180 °C for around 30 minutes. When it finishes baking, drop it on a counter 2 ~ 3 times to remove the steam (to prevent it from breaking around the waist). Take it out immediately and let it cool.
yeast bread fermentation 在 cook kafemaru Youtube 的最讚貼文
150gの強力粉から小さめサイズなら、これくらいのパンが出来ます。
コロネパンも出来ちゃいます!
手ごねが大変な方はこねは、HBでももちろんokです。
手ごねは確かに大変ですが、何度もやってみて慣れてくると
生地のことがだんだんとよく分かるようになって、パンのことが
可愛いなぁと思えるように。
パンは生きてて、自由でその分手がかかります。
動画でも文章でも伝えられない部分もたくさんありますが、良かったら挑戦してみてください。
挑戦したぶんだけ必ずパンのことが分かって進歩します^^
れしぴは下にあります。
フォロー&いいね! も お願いします!!!!!!
twitter
https://twitter.com/cookkafemaru
instagram
https://www.instagram.com/kafemaru/?hl=ja
Blogブログ始めました。
右も左も分からずまだまだですが、これから毎日すこしずつ、まとめていきます^^
https://ameblo.jp/28280807
==================================================
大人気YouTuber “cook kafemaru”の
「罪深いスイーツ」
Amazonはこちらから購入できます↓↓↓
https://www.amazon.co.jp//dp/4046048948/
「世界一作りやすいおうちスイーツ 」
https://www.amazon.co.jp/dp/4046045116/
もしもお住いの近くの本屋さんになかったら、セブンイレブンの
オムニ7でネット予約し、セブンイレブン店頭受け取りで買うことができます!
=============================================
【Ingredients】
Bread Dough:
★150g Bread flour
★10g Sugar
★1.5g Salt
★2g Dry yeast
37g water
72g Milk
10g Unsalted butter(room temperature)
*Egg wash
For Sprinkle
*Bread flour (as needed)
●Ganache
◎100g Dark chocolate
◎40g Milk
【Directions】
●Make Ganache
Warm the "◎" ingredients to melt the chocolate and mix.
Cool slightly.
(The ganache needs to cool down a bit to gain thickness.)
●Make Bread Dough
①Combine the dry ingredients (★)and mix together with a whisk.
②Add water,Milk and mix.
③Put it on the table and knead. (10mins)
④Add butter and knead more. (5mins)
⑤Make it round, then leave it at a warm place until it gets twice as bigger. (primary fermentation)
⑥divide it into 10 pieces and make them round.
⑦Cover them with a wet cloth and leave them for 10 mins. (bench time)
⑧After resting, deflate with your hand,and roll out the dough into an oval shape.
⑨Watch the video and make the shape.
⑩Place on baking paper on a baking tray and leave it at a warm place until they get twice as bigger. (secondary fermentation)
⑪Preheat the oven at 374 °F/190℃.
⑫Bake at 3374 °F/190℃ for 12 minutes.
⑬Place it on a wire rack to cool.
⑭Put the Ganache in a piping bag and fill the bread.
*Baking time will vary according to your oven so please adjust accordingly.
*Be careful not to let the dough dry out when you are letting it rise or rest.
*When the dough is too moist and sticky, powder the dough a little.
***れしぴ置き場***
【材料】
●パン生地:
★強力粉 150g
★砂糖 10g
★塩 1.5g
★ドライイースト 2g
水 37g
牛乳 72g
無塩バター (室温) 10g
*塗り卵
*強力粉(適量)
●ガナッシュ
牛乳で作る簡単ガナッシュです。
◎ビターチョコ 100g
◎牛乳 40g
【作り方】
●ガナッシュを作る
チョコと牛乳をボウルに入れて湯せんにかけて溶かしたら、よく混ぜて滑らかにする。
冷やして絞りやすい固さにして、絞り袋に入れておく。
●丸型コロネにクッキングシートをカットしたものを巻いておく。
*型に直接塗るよりやりやすいです。
●パンを作る
①ボウルに材料(★)を入れて泡立て器で混ぜる。
②水、牛乳、を加えて混ぜる。
ここで水分が足りないようなら加えてもok.
時期や乾燥状態によっても同じ材料でも変わって来ます。
小さじ1程度を加えて状態をみてください。
③テーブルの上に置きこねる。 (約10分)
***頑張ってこねてください^^
④バターを加えてさらにこねる。 (約5分)
***生地がつるんとしてツヤが出たらok。
⑤丸めて、2倍になるまで暖かいところに置く。(一次発酵)
⑥生地のガスを抜き、10個に分けて丸める。
⑦濡れた布巾などを被せて、10分間置く。 (ベンチタイム)
***傷んだ生地を休ませます。
⑧手でかるく押してたまったガスを優しく抜き、生地を円形に伸ばし両端から折ってつまんで留める。
4つ出来たら今度は手のひらで細長く伸ばしていく。
これをコルネ型に巻き付けていく。
巻き始めは少しパン生地を重ねるようにしながら巻き付けていき、最後の巻き終わりはしっかりと生地をつまんで留めておく。
巻き始めと巻き終わりは同じライン上になるようにすると、この部分を下にしておくことができるので、うまく調整してください。
⑨残り6個は丸める。
(動画では1個をアンパンマンにしています)
⑩ベーキングペーパーの上に並べたら2倍大きくなるまで暖かい場所に置きます。 (二次発酵)
***乾燥しないように濡れ布巾やビニールなどを被せます
⑪オーブンを190℃に予熱する。
コロネの方には、溶き卵を塗り、丸いパンには強力粉をふりかけてからカミソリなどで切り込みを入れる、切り込みにオリーブオイルを数滴たらす。
***オイルを垂らすとクープが開きます。
⑫190℃のオーブンで12分ほど焼く。
⑬焼き上がったらケーキクーラーなどの上で冷ます。
⑭冷めたら、ガナッシュを絞って出来上がり♪
yeast bread fermentation 在 生かし屋 IKASHIYA CULINARY ART Youtube 的精選貼文
1つの生地でいろいろ作れる惣菜パンのレシピ
ウインナーパン、ツナマヨパン、たまごハムパン等を作ってます
【材料】
生地
・強力粉 300g
・砂糖 30g
・スキムミルク 10g
・塩 5g
・インスタントドライイースト 3g
・水 204g
・バター 40g
たまごサラダ
・茹で卵 3個
・マヨネーズ 大さじ2
・オリーブオイル 大さじ1
・塩 ひとつまみ
・胡椒 少々
ツナマヨ
・ツナ缶 小1缶
・マヨネーズ 大さじ1
・塩 少々~ひとつまみ
・黒胡椒 少々
その他具材例
・ほうれん草やピーマンなど
・ベーコンやウインナーやハム
・チーズやマヨネーズ
【準備】
・バターを室温に置いておく
【作り方】
1. 【こね~1次発酵】生地のバター以外の材料を合わせてヘラで混ぜ、まとまったら台に取り出してこねていく
2. グルテン膜が出来るまでこねたらバターを加えてちぎるようにして馴染ませ、再び薄いグルテン膜が出来るまでこねる
3. 丸めてボウルに入れてラップをし、30℃で50分を目安に2倍ほどに膨らむまで1次発酵(指で粉を付けて穴をあけ、穴が少しだけ縮んで元に戻らなければOK)
4. 【具材の準備】ベーコンは1cm角にカットし、ほうれん草は熱湯でさっと茹でて流水で冷やし、しっかり水気を絞って2cmほどにカットする
5. 【分割~ベンチタイム】生地を1個60gずつに分割し、ガスを抜いて丸めてかたく絞った濡れ布巾をかけてベンチタイム15分
6. 【成形~2次発酵】
・楕円:手のひらで生地を円形で潰してのばし上下から1/3ずつ折りたたみ、さらに中心で折り合わせてとじる
・丸:ガス抜きして丸め直す
・ハム:ハムよりひと回り大きく手のひらで生地を円形で潰してのばし、ハムを置いてくるくると巻き、両端を合わせるように折ってとじ、縦にして端から1/3を残して切れ込みを入れて円形に広げる
7. オーブン用シートを敷いた天板に並べ、35℃で45分を目安に2次発酵(オーブンで発酵する場合、予熱時間を考慮しはやめに取り出す)
8. 【焼成/220℃に予熱】
・楕円:カミソリやナイフで中心に切れ込みを入れ、上に具材をのせる
・丸:頂点にハサミで十字に切れ込みを入れ、少し広げて具材をのせる
・ハム:上にチーズやたまごサラダをのせる(シンプルにそのまま焼いてもOK)
(照りを出したい場合、好みで溶いた全卵を塗る)
9. 220℃に予熱したオーブンで13分を目安に、底面に焼き色がつくまで焼いて出来上がり
--------------------------------------------------------------------------
【動画でよく使ってる調理器具】
フライパン(20cm):https://amzn.to/2QyY1ny
フライパン(24cm):https://amzn.to/2UtNvz5
フライパン(24cm深型):https://amzn.to/3dj5DEp
鉄フライパン(22cm):https://amzn.to/3a8hqmR
アルミフライパン(24cm):https://amzn.to/3dj6tRz
片手浅型鍋(18cm):https://amzn.to/2QzGXha
片手浅型鍋(21cm):https://amzn.to/2U7ta3o
片手鍋(16cm):https://amzn.to/2QzCj2x
片手鍋(20cm):https://amzn.to/3bd0lZa
ソースパン:https://amzn.to/2U9keuI
まな板:https://amzn.to/2J1fQHI
ガスコンロ:https://amzn.to/3bdtvYa
牛刀:https://www.jikko.jp/fs/jikko/54803
ペティ:https://www.jikko.jp/fs/jikko/54800
撮影機材
カメラボディ:https://amzn.to/2xSXZAd
動画レンズ:https://amzn.to/3t7sfPB
写真レンズ:https://amzn.to/2U7HcCb
録音:https://amzn.to/2U9cGYT
※製品のURLはAmazonアソシエイトのリンクを使用しています
--------------------------------------------------------------------------
▼サブチャンネル(料理実験チャンネル)
https://www.youtube.com/channel/UCqIW0OHh8k2np5ZNz3wz8sg
▼ブログ
http://www.ikashiya.com/
▼Twitter
https://twitter.com/sakihirocl
▼Instagram
https://www.instagram.com/sakiyamahiroshi/
--------------------------------------------------------------------------
↓using translation software.
[Ingredients]
[Ingredients]
dough
・Bread flour 300 g
・Sugar 30 g
・Skim milk 10 g
・Salt 5g
・Instant dry yeast 3g
・Water 204 g
・Butter 40 g
Egg salad
・Boiled eggs, 3 pieces
・2 tablespoons mayonnaise
・Olive oil 1 tablespoon
・a pinch of salt
・a pinch of pepper
Tuna Mayonnaise
・small can of tuna
・1 tablespoon mayonnaise
・a pinch of salt
・a pinch of black pepper
Examples of other ingredients
・Spinach, green pepper, etc.
・Bacon, wiener sausages, ham
・Cheese or mayonnaise
[Preparation]
・leave the butter at room temperature
[How to make]
1. [Knead ~ Primary fermentation] Mix all the ingredients except the butter of the dough together with a spatula. Take it out on a counter and knead it.
2. Knead it until the gluten film is formed then add butter and tear it to mix it together. Knead it again until a thin gluten film is formed.
3. Round it and put it in a bowl then wrap it. Let it undergo primary fermentation at 30 °C for around 50 minutes until it expands to around 2 times its size (Dust it with your finger and make a hole. It will be fine if the hole shrinks a bit and it doesn't return to its original shape.).
4. [Preparation of the ingredients] Cut the bacon into 1cm cubes, quickly boil the spinach in hot water and cool it under running water, squeeze out the moisture well and cut it into 2cm pieces.
5. [Divide ~ bench time] Divide the dough to 60 g each. Release the gas and round it. Cover it with a tightly squeezed damp dishcloth and bench time is 15 minutes.
6. [Shaping ~ Secondary Fermentation]
・Ellipse: Crush the dough into a circle with your palm and stretch it. Fold it from the top and bottom 1/3 at a time. Fold it in the center and close it.
・Round: Release the gas and round it again.
・Ham: Crush and stretch the dough in a circle with the palm of your hand one size larger than the ham. Place the ham and roll it up. Fold it so that both ends are joined. Make it vertical and make a cut leaving 1/3 from the edge and spread it out in a circle.
7. Line them up on a baking sheet covered with baking paper. Let it undergo secondary fermentation at 35 °C for around 45 minutes (When fermenting in the oven, take it out without considering the preheating time.).
8. [Baking/Preheating to 220 °C]
・Ellipse: Make a cut in the center with a razor or knife and place the ingredients on top.
・Round: Make a cross cut on the top with scissors, spread it out a little and put the ingredients on it.
・Ham: Top with cheese or egg salad (or simply bake)
(If you want to make it shiny, apply beaten whole egg if you like.)
9.Bake it in the oven preheated to 220 °C for around 13 minutes until the bottom browns and it will be complete.
